


Pythonで高速なウインドウをキャプチャする
概要
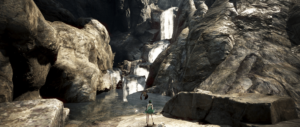
ゲーム画面を画像として取得して、色々したいという場面があったのでウィンドウキャプチャを作成しました。
DirectXをフックしてのキャプチャではなく、winapiを使ったスクリーンキャプチャです。
ソースコード
メインのクラス
githubにソースを公開しています。

import win32gui
import win32ui
import win32con
import win32api
from PIL import Image

class WindowCapture:
    def __init__(self):
        self.windows = self.get_window_list()

    @staticmethod
    def get_window_list():

        def callback(hwnd, windows):
            if win32gui.IsWindowVisible(hwnd) and win32gui.GetWindowText(hwnd):
                windows.append((hwnd, win32gui.GetWindowText(hwnd)))

        windows = []
        win32gui.EnumWindows(callback, windows)

        return windows

    def select_window(self):

        print("ウィンドウ一覧:")
        for i, (hwnd, title) in enumerate(self.windows, 1):
            print(f"{i}: [{hwnd}] {title}")

        selected_index = int(input("対象のウィンドウの番号を入力してください: "))
        selected_hwnd, selected_title = self.windows[selected_index - 1]

        return selected_hwnd, selected_title

    @staticmethod
    def capture_screen():

        hdesktop = win32gui.GetDesktopWindow()
        width = win32api.GetSystemMetrics(win32con.SM_CXVIRTUALSCREEN)
        height = win32api.GetSystemMetrics(win32con.SM_CYVIRTUALSCREEN)
        left = win32api.GetSystemMetrics(win32con.SM_XVIRTUALSCREEN)
        top = win32api.GetSystemMetrics(win32con.SM_YVIRTUALSCREEN)

        desktop_dc = win32gui.GetWindowDC(hdesktop)
        img_dc = win32ui.CreateDCFromHandle(desktop_dc)
        mem_dc = img_dc.CreateCompatibleDC()

        screenshot = win32ui.CreateBitmap()
        screenshot.CreateCompatibleBitmap(img_dc, width, height)
        mem_dc.SelectObject(screenshot)

        mem_dc.BitBlt((0, 0), (width, height), img_dc, (left, top), win32con.SRCCOPY)

        bmpinfo = screenshot.GetInfo()
        bmpstr = screenshot.GetBitmapBits(True)
        im = Image.frombuffer('RGB', (bmpinfo['bmWidth'], bmpinfo['bmHeight']), bmpstr, 'raw', 'BGRX', 0, 1)

        win32gui.DeleteObject(screenshot.GetHandle())
        mem_dc.DeleteDC()
        img_dc.DeleteDC()
        win32gui.ReleaseDC(hdesktop, desktop_dc)

        return im

    def capture_window_area(self, hwnd):

        if not win32gui.IsWindow(hwnd):
            raise Exception('ウィンドウが見つかりません')

        x_offset = win32api.GetSystemMetrics(win32con.SM_XVIRTUALSCREEN)
        y_offset = win32api.GetSystemMetrics(win32con.SM_YVIRTUALSCREEN)

        left, top, right, bot = win32gui.GetWindowRect(hwnd)

        left -= x_offset
        top -= y_offset
        right -= x_offset
        bot -= y_offset

        screen_image = self.capture_screen()
        window_image = screen_image.crop((left, top, right, bot))

        return window_image
サンプル
現在利用されているウィンドウと対応する番号が一覧で出てきます。その後、対象ウィンドウの番号を押下して、output.pngとして画像を保存するサンプルです。
from window_capture import WindowCapture

# インスタンスの作成
wc = WindowCapture()

# ウィンドウの選択
selected_hwnd, selected_title = wc.select_window()
print(f"選択されたウィンドウ: [{selected_hwnd}] {selected_title}")

# 選択したウィンドウの画像を取得して保存
image = wc.capture_window_area(selected_hwnd)
image.save("output.png")